
How To Create A Docker Container Instances In Azure – Lab7
In this tutorial you will learn how to create a Docker Container Instance in Azure. This lab will walk you through the steps to deploy a docker container instance and test the deployment.
Task Details
- Log into Azure Portal.
- Deploy A Docker Container.
- Review deployment details.
- Lauch APP through FQDN.
- Understand the Azure Metric Charts.
Task 1: Log into Azure Portal
- Open a browser tab and go to the Azure portal using URL https://portal.azure.com.
- Sign in with your username and password on azure portal.

Task 2: Deploy A Docker Container
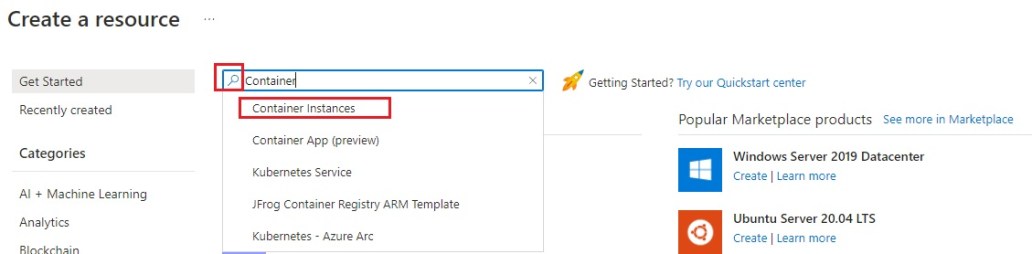
1. From Azure services click Create a resource.

2. Search for Container and afterwards click Container Instances.
3. Click Create under Container Instances.

4. Select your subscription and create a new resource group.

5. For Container Details fill the details.
- Container Name: Use a unique name.
- Region: Select best region suited for you.
- Image Source: Quickstart images.
- Image: mcr.microsoft.com/azuredocs/aci-helloworld:latest (Linux)
- Size: leave as default.
6. Now click Next: Networking button.
7. For Networking type leave Public selected.
8. Enter a unique DNS name label. This will be your FQDN.

9. Now let’s click the review + create button.
10. Once the instance Validation passed click the Create button.
Task 3: Review deployment details
1. Click the Go to resource button.
2. On this container page you can review if your container is running, group details, location, IP Address and FQDN. 
Task 4: Lauch APP Though FQDN
1. Locate the Fully Qualified Domain Name (FQDN). Copy the URL and paste it into your browser.
2. You should have received the following landing page.

Task 5: Understand the Azure Metric Charts
1. Scroll down in Overview page to see the Azure Metric charts.
2. Refresh the FQDN URL a couple of times to simulate request response cycle.
3. Please wait for 2-5 minutes and refresh the page if the graph does not show the traffic details.
4. You can see following charts:
-
- CPU: Provides CPU Usage details.
- Memory: Provides RAM memory usage details.
- Network Bytes Received.
- Network Bytes Transmitted.
The above metrics will help you understand the incoming traffic, outgoing traffic and how its affecting the container.

You have successfully used Azure Portal to deploy a Docker Container in the Azure Container Instance. Don’t forget to go through and delete all you have created when you are done.
I hope this article was helpful, if you have any questions, please feel free to contact me. If you would like to be notified of when I create a new post, you can subscribe to my blog alert.
Discover more from Patrick Domingues
Subscribe to get the latest posts sent to your email.