
How To Create A Linux Virtual Machine in Azure – Lab5
In this tutorial you will learn how create a Linux Virtual Machine in your Azure Lab. I will guide you through the process of logging into Azure Portal and proceeding through the VM wizard to create your Linux Virtual Machine. I will then show you how to SSH into your Linux Virtual Machine and test it out.
Task Details
- Log into Azure Portal.
- Create a Linux Virtual Machine.
- SSH into Linux Virtual Machine
Task 1: Log into Azure Portal
- Open a browser tab and go to the Azure portal using URL https://portal.azure.com.
- Sign in with your username and password on azure portal.

Task 2: Create a Linux Virtual Machine
1. Click on the Virtual machine’s from the menu in the Left side panel. You can also use the search bar at the top to find the Virtual Machines page or you can use the Virtual machines icon right Infront of you.

2. Now let’s click on the Create button and then click on Azure virtual machine.

3. Now on the Basic tab
- Subscription: Leave it default selected.
- Resource Group: Click Create New and name it AzureLab.

- Virtual Machine Name: Enter a VM name.
-
- Ex: AzureLVM01
-
- Region: Choose a Region (US) East US or
-
- if this is a trial you may have to select different regions to see if you have available size packages in my case, I had to select Australia East.
-
- Availability Options: Leave availability zone as default
- Security Type: Leave it as Standard.
- Image: Choose Image – Ubuntu Server 20.04 LTS – Gen2
- Size: Click on the drop down and select a size for your virtual machine.

- Configure ADMINISTRATOR ACCOUNT
- Authentication Type: Password

- Inbound Port Rules
- Public inbound ports: Allow Selected ports
- Select inbound ports: SSH (22)

click on Next:Disks >
4. Now on the Disks tab.
-
- OS disk Type: Select Standard SSD

- Click on Next : Networking >
5. Now on the Networking tab.
Leave Networking as default, there is no need to change anything.
- Click on Next : Management >
6. Now on the Management tab.
- Monitoring :
- Boot diagnostics: Set to Disable.
- Click on Next : Advanced >
7. Now on the Advanced tab.
- Leave Management as default, there is no need to change anything.
- Click on Next : Tags >
8. Now on the Tags tab.
- Tags: You can add tag in Name/Value pair as per your understanding.
- Name : Virtualmachines
- Value : AzureLab

- Click on Next : Review + Create >
- Next: Review + Create
- If you see this “Validation passed” message on top of the screen, that means you have configured the virtual machine successfully or if you see any error message, then you will need to review your settings.
9. Once you see the message Your deployment is complete your virtual machine is ready. Afterwards click on Go to Resource.
- Now you can review all Deployment Details. Understand all the resources that got created.

Task 3: SSH into your Linux Machine
1. Click on Connect dropdown and select SSH.

2. Copy your private key path and place it into your ssh command.
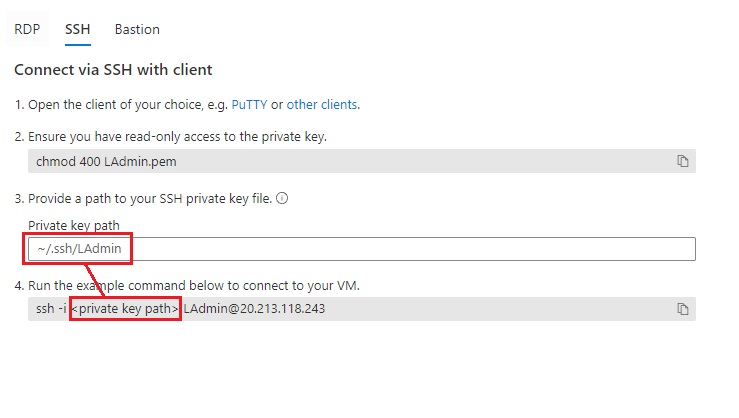
3. Open up PowerShell and replace the command with your specific access information and connect. You will also have to accept the certificate.

That concludes this tutorial you have successfully created a Linux Virtual Machine in Azure and you were able to connect to the virtual machine using SSH.
I hope this article was helpful, if you have any questions, please feel free to contact me. If you would like to be notified of when I create a new post, you can subscribe to my blog alert.
Discover more from Patrick Domingues
Subscribe to get the latest posts sent to your email.